Unit 9: Go The Distance: Projects
Select a unit
- 1 Go The Distance: Choosing distance learning
- 2 Go The Distance: Academic reading
- 3 Go The Distance: Academic talk
- 4 Go The Distance: Academic writing
- 5 Go The Distance: Finding and using source material
- 6 Go The Distance: Going the distance
- 7 Go The Distance: Critical thinking
- 8 Go The Distance: Social learning
- 9 Go The Distance: Projects
- 10 Go The Distance: Succeeding in exams
Session 5
Presentations
Making presentations is a key part of any distance learning course. Join Tim in this video guide and find out how to perfect your presentation technique with digital tools.
Activity 1
Develop your digital presentation skills
Making presentations is a key part of any distance learning course – but how do you make the most of digital tools and resources to deliver a perfect presentation? Don't worry! Tim from BBC Learning English is here to help you out!
How Tim solves his presentation problems
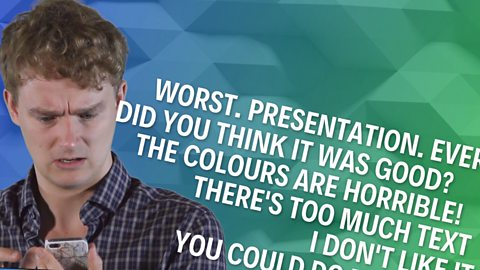
Tim's first presentation didn't go too well!
To do
Watch the video and listen for the tips Tim mentions about IMAGES, VIDEO and DESIGN PRINCIPLES. Write these down if you like and check your answers – in an activity – later on this page.
Watch the video

Tim
Hello! Ok, I’ve got something I want to show you today. It’s something I’ve been working on for a while as part of an online course that I’m doing – yes, I too am a distance learner and I’m very proud of this. It’s my presentation on how to be a great presenter. Want to see it? Ok, here it is – tah-dah! I’ve put it online and invited my fellow students to give me feedback. I wonder what they’ll say… Aha, this will be their feedback now… Let’s see what they say. Oh dear. Hmm… now that is not good. Looks like my friends didn’t like my presentation. I need to reflect on this and make it better.
To make my presentation better, I am going to add some digital elements to make it more interesting for the viewer. I really want to engage the viewers and get my message across effectively, so I get a good score in my online course.
So what can I add? First of all, I’m going to add some images. I can find them by looking for free images online. There are lots of websites that offer free photos, graphics and animations. So let’s go to those websites and download some. Of course, I will get the owner’s permission to use their images and credit all the sources I used. Ok, so let’s download. Great!
Now I’m going to work with those images. I can use image editing software for simple tasks. Or I can use image-editing websites to do things like crop, rotate, resize, and save at a reasonable file size. Let’s look at the meaning of those words in an image editing context. 'Crop' means removing parts of the image so we focus on a smaller part of the whole. 'Rotate' means turning the image around from zero to 360 degrees. 'Resize' just means making the image bigger or smaller, according to our needs.
I think I’d like to include some video and audio in this presentation. I can film and record some myself on my phone. Or again I can find free resources online. I could also buy some video or audio from the web but I prefer to save money, so I’ll just use the free ones.
Ok, I’ve got some great pictures, video and audio, so now I need to put them together in a presentation. I will build my presentation based on good design principles I learned about online: not too much text on the screen; not too many slides; don't overdo animation and effects; structure the presentation using sections like introduction, main body, conclusion. I’ll use some online tools for this or software I have on my computer, like PowerPoint or Keynote. Just a second... and finish!
Right, I have made my new presentation. It looks a lot better than the last one. Let’s see what my fellow students think. Wow! That was fast! Thank you, yeah, thank you, what can I say, it just came over, thank you, thanks.
So there it is, you can use digital resources and software to make your presentations stand out from the rest. Give it a go and maybe you can be a presentation hero like me! See you next time!
Presentations: Three things to think about
We asked you to listen for Tim's advice about IMAGES, VIDEO and DESIGN PRINCIPLES. Did you get all the tips? Check your answers with this activity.
Presentations: Three things to think about
3 Questions
Check you've understood Tim's tips about working on presentations with these questions
Help
Activity
Check you've understood Tim's tips about working on presentations with these questions
Hint
Tim said you can crop and resize images you use in your presentationsQuestion 1 of 3
Help
Activity
Check you've understood Tim's tips about working on presentations with these questions
Hint
Tim talked about using your smartphone for video contentQuestion 2 of 3
Help
Activity
Check you've understood Tim's tips about working on presentations with these questions
Hint
Tim talked about text size, using too many slides and using too much animationQuestion 3 of 3
Excellent! Great job! Bad luck! You scored:
Tim's five top tips for perfect presentations
Here's what we've learned so far about using digital tools to make presentations. Did you spot all five tips?
- Add images to your presentation to engage the audience – but make sure you have permission to use them and credit sources where appropriate.
- Image-editing software is useful – crop and rotate images to get the best view, resize them bigger or smaller and save them at a reasonable size.
- You might want to include video or audio as well – why not record your own with your smartphone? You could also look for free resources online.
- Follow good design principles. Don't use too much text, don't use too many slides, don't overdo animation, and structure your presentation sensibly.
- You can use online tools or software on your computer to add the final touches to your presentation. Good luck!
Find out more
That's all for now. Next time, Sian's looking at how you can take the digital skills you've developed during your study journey – and use them in your post-study life. Until then, visit our partner The Open University for more digital literacy tips – just click on the 'Where next?' link.
Where next?
Session Vocabulary
Find out more about distance learning – visit our partner,The OU